Category: Tech

  • How To Recall An Email In Outlook? Step-by-Step Guide & Adding Delayance In Email Delivery

    How To Recall An Email In Outlook? Step-by-Step Guide & Adding Delayance In Email Delivery

    There’s no room for blunders in the workplace, and the hazard most frequently seen is either sending mail that doesn’t make sense or to the wrong person. So, a question making rounds over the internet is how to recall an email in Outlook.

    It might be a nuisance but we have decoded the way to tackle it. Now you can recall an email on both Mac and Windows by using Desktop clients. It isn’t available for web users and is possible only if you and your recipient using Microsoft 365 and working in the same place.

    If you prefer recalling an email that you have sent someone out of the place, then you will most likely face failure as it doesn’t work.

    It might seem easier to use this feature but often comes with so many confusing menu options which hinders our ability to use it daily. 

    In this guide, we will delve deeper into how to recall an email in Outlook for desktop and via the desktop client, reasoning if it didn’t work, and how to put a delay in sending emails.  

    How To Recall An Email In Outlook For Desktop (Latest Version)?

    Recalling an Outlook mail is only possible on the desktop when you have installed the latest version, the process is breezy with these easy-to-follow steps: 

    • On the desktop page where you have logged in to your Outlook account, navigate to the folder pane on the left side and select the ‘Sent Items’ folder.
    • Double-click on the sent mail shu h you would like to recall, and you will be redirected to a separate window.
    • In this email window, navigate to the ribbon located at the top and select the ‘Recall message’ button. 
    • After this, you will get a confirmation dialog box. Click on ‘OK ‘ and you will be directed further. 
    • When you have started recalling, you will receive a ‘Message Recall Report ‘. Open this report and click on the link given in this mail and it also shows the status, whether your recalling has been successful, failed, or still pending. 

    It might be the easiest procedure through which you can manage your Outlook emails that you sent mistakenly or rather earlier than the final preview.

    How To Recall An Email In Outlook Via Desktop Outlook Client? 

    How To Recall An Email In Outlook Via Desktop Outlook Client? 

    What if you accidentally sent a confidential email to the wrong person? No worries you can easily recall it using Desktop Outlook Client and is considered the top choice in the workplace environment.  

    • You just need to install the latest version, activate the client, and click on ‘Home’ to begin the procedure: 
    • On the homepage, click on the left-side menu, and choose ‘sent’ which contains emails which already been sent.
    • Tap on the maul you want to read and double-click on it. The maillot opens in another window. 
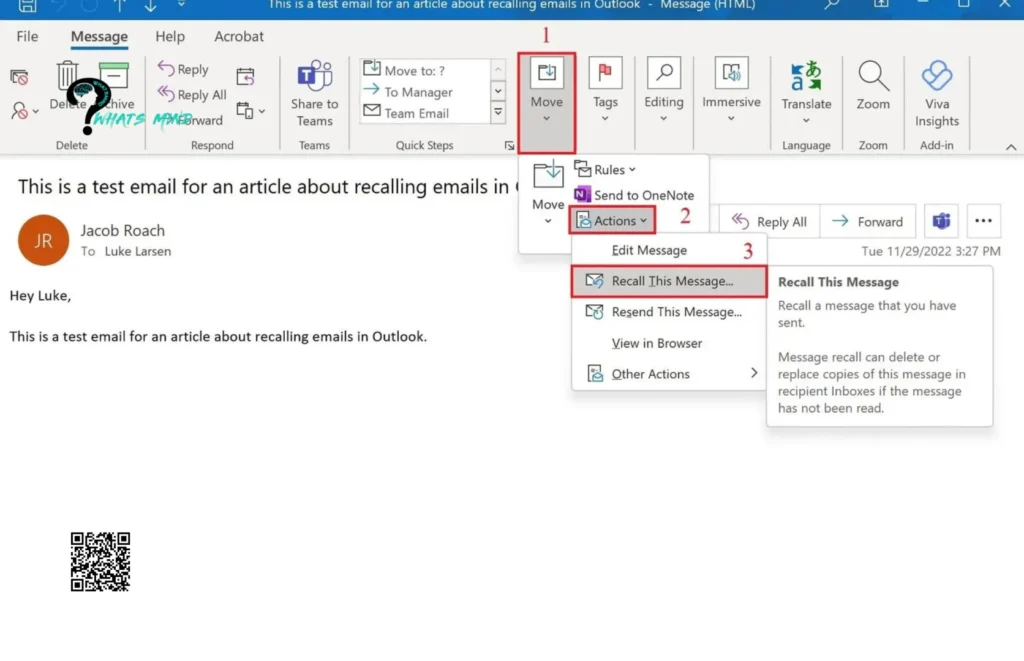
    • Make sure the message tab is in the email window, now by selecting on three-dotted menu on the right, choose action, and then recall this mail. 
    • If you have an updated version, then you’ll get the recall mail right after opening the toolbar, moving to the sent item, and double-clicking it. 
    • If you don’t find the three dots menu, then you need to tap on ‘Move’, select ‘Actions’, and Recall the mail.
    • A Window appears on your screen giving you two options, ‘Delete Unread copies of this message’ or maybe ‘Delete unread copies and replace with a new message’, choose the one which you want. Outlook will notify you whether your request succeeded or failed. After confirming, if you request for replacement, the process will continue further.
    • For replacing the message with a new one, a new screen will pop up where you can edit the message. For composing a new mail, the outlook also recalls your previous message. 
    • Click on ‘Send’ once you have revised your previous mail.

    Remember after sending a revised message, your previous message would miraculously disappear, so you must type either urgent or something like this so that your revised message is opened instead of the previous offensive message.  

    Even if the recipient didn’t open your message, he will still be aware that a botched message has been sent to him/her.

    What If Recalling Outlook Mail Doesn’t Work? 

    How to recall an email in Outlook isn’t always the biggest concern sometimes the issue is what if it doesn’t work. It doesn’t usually work out and it’s due to several reasons, including: 

    • You might be using Outlook on mobile devices and Mac while recalling is only possible with a desktop app on Windows or the latest version of Outlook. If you are working in a company and possess an Enterprise E3 M365 license, you must contact your administrator as only they will be able to access this functionality. 
    • The recalling will only be possible until the email remains in the recipient’s inbox. Once it moved elsewhere or the client has redirected it into another folder, then you can’t recall this Outlook mail.
    • Make sure the recipient uses an Outlook mail account, and you can’t know this ahead of time unless you ask them, if he’s using Apple Mail, Yahoo, or Gmail then the recalling will miserably fail.
    • If your recipient already has opened the blotched mail, then recalling won’t work. However you can ask them to ignore that mail and consider the revised mail you will send afterward, but it will stay in their inbox and they can access that anytime until they manually delete it.

    How to recall an email in Outlook might be an sought-after question but it will only work if the recipient has the appropriate setting that allows recalling and their mailbox is hosted on an Exchange server. 

    When You Should Recall An Email In Outlook? 

    How to recall an email in Outlook and when does the recalling become necessary? The Recalling calls for when: 

    You have mistakenly sent an email that contains typos and mistakes, as it imparts a negative impression, so you must send a corrected email immediately. 

    You have sent it to the wrong recipient, you must recall it and then send it to the relevant person.

    In case you have sent a message that has sensitive information,  recall it immediately to avoid a data breach.

    But I suggest you recall as soon as possible, as the sooner it is done, there are chance it won’t be opened.

    Never send confidential information without encryption as there are chances it will be sent to the wrong person and can easily be hijacked by Somers and threat actors. Add an ID check while sending emails and make sure it confirms regulatory standards.  

    How to Add Delay In Your Outlook Emails? 

    How To Recall An Email In Outlook might not be successful all the time so you can simply delay the mail. 

    If you regularly share confidential data and are all the time to email then there’s a higher chance of you making some mistakes, so scheduling when the email must be sent seems a good choice. 

    You can easily add delay by these step-by-step instructions: 

    • In your Outlook account,  tap on ‘File’ located in the upper-left corner of the screen.
    • Move down and select ‘Manage rules & alerts.’
    • The Rules and Alerts window will appear, you need to select ‘New rule’ here.
    • Now you will be redirected to another window and click, here you will see ‘Start from a blank rule’ which further includes, the Apply rule on messages I send, tap on, it, and continue. 
    • Now again click Next to continue, and here the part comes for the confirmation,  confirm by tapping on Yes.
    • You can Defer delivery by selecting the several minutes option. Select the link which further opens up a window where you choose your preferred duration.  You can stretch the time as far as 120 minutes, after selecting click on OK, and continue by clicking on Next

    If you have any exceptions, now is the time to select those and then continue. 

    Name your rule and see whether a ‘Turn on this rule checkbox’ is available or not and then finally finish the procedure. 

    Bottom-line 

    In conclusion, there are not many options to tackle the question, ‘How to recall an email in Outlook?’ But it has become possible by desktop outlook account, you need to log in to your account in the window, follow the instructions and you can easily revise the message you have sent.

    Keep in mind it’s only possible if the recipient using Microsoft Account 365 and working in the same workplace as you. 

    If he’s using Apple email, Gmail, or taboo then you are out of look as the recalling will fail.

    You can put a delay in sending your message as immediate sending often results in incomplete mail and maybe sometimes delivered to the wrong address. 

    Give it a thorough read to understand fully how to proceed with recalling and sharing have you ever mistakenly sent a mail to anyone? 

    FAQs on How To Recall An Email In Outlook 

    How do I recall a recall a message in Outlook that’s already been sent? 

    You need to navigate to the sent folder, double click on the message you want to recall and it will open in another window, select whether you want to recall and resend, and then mark the checkbox, ‘Tell me if recall succeeds or fails for each recipient’, and click on ‘OK’. 

    Can Outlook recall emails sent to external? 

    No, it’s not possible to recall emails that are sent externally, confirmed by developers.  

    More that we think you might like to read…

    For more info visit Whatsmind.com

  • Leonardo AI: Discover Its Key Features & Real-world Use Cases

    Leonardo AI: Discover Its Key Features & Real-world Use Cases

    As AI-powered solutions become more popular, dozens of cool tools have been created to accomplish even the simplest tasks.

    Whether you want to create images for your products, make visuals for games, or create content for your social media, there are AI tools to assist you.

    One of these useful tools is Leonardo AI. This AI-generative tool allows users to create images by giving text prompts.

    It’s not limited to simple image creation but also provides other unique features like single-click video generation, real-time image generation, a canvas editor, and an upscaler to enhance your artwork.

    I am also going to share some tips at the end that will help you use your artwork to make money.

    In this article, I will discuss the following points:.

    • What is Leonardo AI?
    • Its Key Features.
    • How to use it.
    • Comparison between the free and paid versions.
    • Some of its real-world applications.
    • And some FAQs

    So let’s dive in.

    What is Leonardo AI?

    Leonardo AI is an AI-powered online platform that generates images using textual prompts from users.

    With Leonardo AI, creating exciting images and short videos, converting drawings into images, and real-time image generation are just a few steps away.

    In the Home section, you can find the artwork created by other users along with their prompts. This is very useful for beginners; they can try out the prompts used by others by making some changes.

    In addition to creating images and videos, it also helps you upscale your images and edit them. For this purpose, it provides some tools that I will discuss later in the article.

    In addition to the website, Leonardo AI is also available on the App Store. However, it is not really available on the Play Store.

    Well, it’s only a short introduction, and there is much more to learn about Leonardo AI. Let’s explore its features.

    Key Features Of Leonardo AI 

    Unlike other AI tools, Leonardo AI provides a wide range of options to generate unique images such as image type, tone, image guide, and other elements.

    These options undoubtedly produce captivating results. Following are some of the important features that make it stand out:

    Diverse Customizable Settings:

    Leonardo AI gives you a wide range of image settings that you can customize to create the image according to your preferences.

    Diverse Customizable Settings
    • It allows you to choose the number of images you want to get. Other options include the “PhotoReal” feature (that gives you realistic images), Alchemy, Prompt Magic, Transparency (for getting pictures without background), and a guidance scale. Some of these options might not be available to free users. 
    • Moreover, you can select the dimensions by choosing them from the given options, the drop-down menu, or by sliding the two scales.

    These are the settings available on the left sidebar. Now let’s talk about the option available under the prompt bar.

    option available under the prompt bar

    Here, you will find the option to choose the AI model that will generate the images.

    It has 14 different AI model options. In addition to these, you can also use platform models and community models by clicking on “Select Other Model” at the end of the list.

    Secondly, it gives you 14 different style options, including anime, cinematic, creative, dynamic, environment, etc. The different style options allow you to get the desired photos by giving them a unique look.

    Next, you can see there is a new feature named “Elements.” This section features different modes, including 3D scripts, colorful scribbles, cybertech, dark arts, etc.

    features different modes

    It’s a really amazing feature, as you can choose the specific mode from this section instead of explaining it in the prompt.

    You can also include a negative prompt by enabling the toggle. In the negative prompt, you enter the things that you don’t want to see in your images.

    AI Video Creation: 

    With Leonardo AI, you can turn a still image into a short video. It doesn’t give you the option to create videos by giving a prompt, but instead converts your generated images into short animated videos.

    To convert an image to video, follow these steps.

    • Click on the small video icon at the bottom of your image.
    • Next, it will show an interface like this.
    To convert an image to video, follow these steps
    • Adjust the settings according to your requirements and hit “Generate’. This action will use 25 tokens out of the 150 daily tokens.
    • Once done, it will convert the image into a video.
    convert the image into a video

    Real-time Canvas:

    This is one of the most interesting features of Leonardo AI. With real-time canvas, you can convert your drawings into real-time images. You can also upload a sketch or a picture, and Leonardo  AI will convert it into an attractive image.

    I tried this feature, and it turned out like this:

    Real-time Canvas:

    Don’t judge my drawing; I am also using it for the first time. You can also convert your rough ideas into captivating images by using it.

    Additionally, it gives you the option to use prompts to generate images, which makes it more unique. With every word you write, you will observe a change in the picture.

    There is a narrow sidebar where you can find different settings like the image uploading option, the option for a small prompt box, the selection tool, the eraser tool, brush tool, the color palette, and the redo and redo buttons.

    Below the canvas, there’s the prompt box. Next to it, there is the image effects option, like in the previous section.

    One interesting option here is the ‘Creative Strength’; the higher the setting, the more noticeable the differences will be between your drawing and the resulting image.

    Real-Time Generation:

    Real-time generation is similar to real-time canvas. But it gives four different elements, including kids Illustration, Toon & Anime, Folk Art Illustration, and Coloring book. These options enable you to make the images or scenes even more unique.

    Using this feature, you can create a complete scene by giving it prompts. With each change you make in the prompt, you will see a change in the result.

    Real-Time Generation

    If you don’t like the image, simply click on the “Random Seed” button, and it will give you a new result.

    Canvas Editor and Universal Upscaler:

    Both of these are image editing tools. With the canvas editor, you can add text to your image, add an element to your picture by using the “Sketch” option, and perform various other tasks.

    The universal upscale features allow you to improve your image quality by adjusting the different settings. Practicing with different pictures and noticing the difference will help you master these editing features.

    A Vast Library of Models:

    By clicking on  the “Finetuned Models” section on the left side bar, you can find a vast library of AI models used for generating images.

    All of them are trained with a knowledge base and, hence, provide diverse results.

    These include platform models, community models, and your own models. You can select one of them and generate images using them.

    In addition to these features, Leonardo AI gives a texture generation option and  Training & Datasets” option that allows you to train your own AI model. But to train your model, you must upgrade to the pro version. It’s not available to free users.

    How to Use Leonardo AI?

    To use Leonardo AI, you first need to make an account. Follow these steps to create your account:

    • Visit their official website.
    • Next, click on “Create Account.”.
    • Sign up using your email or Google account.
    • Your account will be created.
    • It will ask you to select a username. Choose one for your account. 
    • Fill in any other requirements and hit “Next.”.
    • Once done, you are good to start.
    • You might neeed to verify the email if you signup using email.

    In the left sidebar, you will see the different features, explained above. If you want to generate an image, simply click on the “Image Generation” option.

    Enter the prompt in the prompt box, adjust the settings according to your requirements, and hit “Generate.” It will give you the results.

    You will notice two digits (suppose 10) with the coins icon on the “Generate button”. This tells you that this action will use 10 tokens.

    Leonardo AI gives 150 free tokens daily. Some actions will use fewer tokens, while others, like converting images to videos, will use more tokens.

    To get the most out of this amazing platform, use the tokens carefully. Don’t waste your tokens by creating random pictures.

    One random picture can be fine when starting, but the rest of the time, carefully make the prompts and then use them to generate images.

    Comparison between Free and Paid Version?

    Leonardo AI is a freemium tool. Most of the useful features are free, but of course, there are some perks that the free user cannot enjoy.

    Leonardo AI provides one free and four paid plans. The paid version varies in price. It starts at $10 per month and goes up to $48 per month.

    A team’s plan is also coming soon that will include services beneficial for companies and other groups.

    Now, as far as the comparison is concerned, paid plan users get more tokens, i.e., 8500 tokens per month for a $10 plan, and these tokens reset on their billing date.

    Free users get 150 daily tokens, i.e., approx. 4650 tokens per month, and they reset every 24 hours.

    Moreover, paid users also get the option of training their own AI models and keeping their generated images private, but free users cannot use these features.

    You can see the complete pricing plan and comparison by visiting their official pricing page.

    What Are the Real-World Applications of Leonardo’s AI Art?

    All of us know the various AI tools that can be used for creating images. But the majority of people don’t know how to use them to make money.

    Well, don’t worry; I am here to guide you. I am going to share some of the most effective ways to use these AI-generated images to make money.

    • One of my favorite ways is to use the AI art to make printed shirts. Printed shirts are in trend nowadays, and everyone loves shirts with captivating and beautiful designs. You can use Poe.ai or chat GPT to create the best prompts, and then use the prompts for creating images.
    • Since Leonard AI allows you to create images using different image effects, you can create scenes for comic books and fiction stories and sell them.
    • You can make and sell unique and eye-catching cover art for books.
    • Also, you can create vibrant and attractive images for social media posts. After editing the picture and adding relevant text and logos, the image will be ready for attracting traffic.
    • For making creative and engaging ads, give relevant prompts to Leonardo AI. It will give you high-resolution images that you can use in your product ads. Remember, the more engagement your ads get, the more successful your product will be.
    • The easiest method is to create exciting wallpapers using Leonardo AI and sell them on online marketplaces like Etsy.

    So, these are some of the ways you can make money using Leonard AI art.Check out them and stick to the one in which you have interest.

    Conclusion:

    Leonardo AI is indeed one of the best AI image generator with an extensive range of features that promise its uniqueness. It provides various functionalities, but its attention to detail makes it different from other AI tools.

    It has a simple web interface that enables even a simple person to use it , offering a blend of functionality and simplicity.

    It’s a freemium tool. The free version is enough for a simple user, but if you are operating on a large scale, you should consider purchasing the pro version.

    There is no difference in the quality of the results, but pro users get some additional benefits that streamline the process.

    There are different ways to earn money using Leonardo AI artwork. I have explained all these points clearly for your better understanding. I hope this will help you.

    FAQs

    How does Leonardo AI prioritize the user’s safety?

    According to Leonardo AI, they take the safety of their users very seriously. They have taken major steps to prevent NSFW (Not safe for work) images.

    These steps include filtering inappropriate words at the prompt level to avoid unpleasant results. 

    Moreover,any inappropriate output will be flagged, warning the users about the NSFW content.

    To avoid such image generations in your feed, disable the “I confirm that I am over 18 and want to show NSFW content by default” toggle in the settings.

    Can others see my artwork on Leonardo AI?

    Yes, every piece of art you generate as a user will be public. The option of creating private images is available only for pro users.

    If you don’t want others to see your images, just delete them after downloading. This way, it will be saved on your device but removed from the platform.

    Do I own the rights over the content I create on Leonardo AI?

    Yes, you own every piece of content you generate using the platform. According to Leonardo AI, it gives its users complete rights and ownership of their inputs and the output generated. So, you can use them for commercial purposes fearlessly.

    More that you’d like to read…

    For more info visit Whatsmind.com

  • An in-depth guide to Poe AI: Quora’s AI Chatbot Aggregator

    An in-depth guide to Poe AI: Quora’s AI Chatbot Aggregator

    Our dream of seeing robots work for us became nearly true with the launch of OpenAI chat GPT in 2022.

    After that, the world’s high-tech companies started creating more advanced and efficient chatbots. As a result of which we get chatbots like Google’s Gemini, Microsoft Copilot, Meta AI, etc.

    We now have the most advanced chatbots created by different companies, all with their own unique properties. 

    But what about a platform that provides all these advanced chatbots in one place and also provides you with the option of creating your own chatbot and earning money? Sounds crazy?

    Well, that’s a reality with Poe AI. The ultimate AI chatbot aggregator that provides access to a vast library of chatbots under one roof.

    And the most interesting part is that you don’t need to spend a lot of money to use this amazing tool. It’s freemium. I will share a trick with you later in the article that will help you get the most out of the platform while staying free.

    In this article, I am going to discuss the following points with you:.

    • What is Poe AI?
    • Its Unique Features
    • Names of AI chatbots available it contains.
    • How to Access and Use it?
    • How to use it effectively while staying free 
    • How To Create Your own Bot
    • How to earn money with it?

    If you are always curious about new AI tools and their unique functionalities, Trust me, this article is going to be very interesting, so read it till the end. Let’s start.

    What is Poe AI?

    In simple words, Poe AI is a platform offered by Quora that provides access to various chatbots like Chat GPT, Gemini, Claude, Stable Diffusion, and various others on one platform. 

    And when I say “various other,” I mean 55+ official chatbots of OpenAI, Google, Meta, and other high-tech companies.

    It also has its own AI chatbot called”Assistant,” which operates using Chat GPT as the base bot. One of the most interesting things about Poe AI is that it provides you with a variety of chatbots created by other users.

    It provides you with category-specific chatbots created by users. And these niche-specific websites are not even less in number; there is a long list. Honestly, when I explored these chatbots, I was really amazed by the results they provided. Just look at the example below.

    What is Poe AI?

    Take a second and appreciate the creativity and versatility of the results. These are some of the interesting chatbots in the creative-writing niche created by the users. Its just a small slice of the pie; there are various other categories with many interesting chatbots to help you.

    Now that you know what Poe AI is, it’s time to explore its unique features.

    Features of Poe AI:

    Poe AI provides various features that make it unique. These features are listed below:

    1. First, it provides a vast library of both official and user-created chatbots.
    1. It allows you to compare the responses of different chatbots to get the best result. For example, if you create an image with StablediffusionXL, it will show these options after providing the response.
    Features of Poe AI

    So by providing the option to create an image with” Playground-v2.5,” it allows you to compare the responses and select the best outcome.

    1. There is an “All Chats” option in the sidebar, you can see. It is simply your chat history. It saves all your previous chats. So if you have created an image, generated any text, or compared the results, you can access them again at any time.
    1. You can share your chat with others by clicking on the small upward arrow in the top-right corner. You can select specific messages and share them through the link.
    1. There is a “Create Bot” option that gives you the option to create your own chatbot according to your preferences and knowledge base.
    1. And yes, how can we forget this? This gives you the option to earn money by monetizing your chatbot. There are multiple ways which can help you earn money using your chatbot. I will explain this later for our readers in the article.

    Which AI chatbots are Available on Poe AI?

    As mentioned earlier, there are 55+ official chatbots available on Poe AI. There might be more when you read this article because they are continuously updating them. Here are some of the important chatbots:

    • Web-Search – 
    • Claude-3-Opus – 
    • Claude-3-Sonnet – 
    • Claude-3-Haiku – 
    • Claude-3-Opus-200k 
    • Claude-3-Sonnet-200k
    • Claude-3-Haiku-200k
    • GPT-4 
    • Playground-v2.5 
    • Claude-instant-100k
    • DALL-E-3
    • StableDiffusionXL 
    • Mistral-Large –
    • Mistral-Medium
    • Llama-2-70b-Groq 
    • Claude-2.1-200k
    • Claude-2-100k
    • Claude-2
    • Claude-instant –
    • Gemini-Pro – 
    • RekaFlash
    • ChatGPT 
    • ChatGPT-16k
    • GPT-4-128k
    • Mixtral-8x7B-Chat –
    • DeepSeek-Coder-33B-T 
    • Code-Llama-70B-FW 
    • CodeLlama-70B-T
    • Qwen-72b-Chat –
    • Qwen-72B-T: Qwen 1.5 Chat (72B) by Alibaba.
    • Google-PaLM 
    • Gemma-Instruct-7B-T
    • Gemma-7b-FW 
    • fw-mistral-tb 
    • MythoMax-L2-13B 
    • LLama-2-13B 
    • Llama-2-70b
    • Code-Llama-34b 
    • Llama-2-13b 
    • Llama-2-7b.
    • Code-Llama-13b
    • Code-Llama-7b 
    • Solar-Mini –
    • GPT-3.5-Turbo-Instruct 
    • GPT-3.5-Turbo 
    • Mixtral-8x7b-Groq

    You can see the complete list by visiting their official website.

    How To Access Poe AI?

    Accessing Poe AI is quite simple. You can access it by visiting their official website, https://poe.com/, and creating an account.

    It’s available on the Android Play Store and the iOS App Store. You can also download it for Windows.

    So, if you’re at work or on the go, you can access all these chatbots through the mobile app and solve your problems.

    It’s also a great way of killing boredom; you can spend time exploring different chatbots and identifying how well they work.

    How to Use Poe AI?

    Here comes the fun part. The website has a very simple interface, and therefore it’s easy to use. To use this, simply visit the official website. Create an account or sign in. An interface like this will appear:

    How to Use Poe AI?

    To chat with the assistant, type your query in the search bar, and the assistant will provide you with the answer.

    However, you can also explore the various chatbots; a few of them will be available only to subscribers, but most of them are free to use with a daily messages limit.Once you select a chatbot from the list, you can chat with it or ask them a question, riddle, math problem or whatever you want.

    explore the various chatbots

    It also gives prompt options that help especially if you are using it for the first time. You can compare the responses of different chatbots related to a particular query by selecting one from the list given after the response.

    prompt options

    To find out the category-specific user-created chatbots, follow these steps:

    • Click on the “Explore” option in the top left corner. You can find all the categories over here in the picture.
    Click on the “Explore” option in the top left corner.
    • Choose the category.
    • Select the chatbot that suits your needs. You can select the right one by reading its description.
    • Next, explain your problem to the chatbot, and it will provide an answer according to its knowledge base.

    Is Poe AI-free?

    It’s freemium. It allows you to chat with a wide variety of chatbots but with a daily message limit.

    Poa AI gives about 3000 compute points to each user that are renewed in 24 hours. Some chatbots use more points, while others use less. 

    For example, the chatbot Claude-3-Sonnet uses 200 points for each message that you send; on the other hand, Playground v2.5 uses only 40 points per message.

    So, to get the most out of Poe AI, you need to use these points carefully. You can find out the compute points a chatbot uses per message by following the below-mentioned steps.

    • Open the chatbot chat box.
    Is Poe AI-free?
    • Here, you will see the compute points under the description.
    • You can track your remaining compute points by visiting the settings. In the settings, you will also see the time remaining in the resetting of the compute points.

    Opt for the chatbots that require fewer compute points or subscribe to the pro version to get more compute points.It’s $19.99 per month and $199.99 per year. 

    How to Create Your Own Bot on Poe AI

    Creating your own AI bot on this platform is relatively simple and requires no coding skills. A person with no programming background can make a bot on this platform by following the below-mentioned steps.

    • Go to https://poe.com/ and login to your account.
    • Select “Create Bot” from the menu that you will see the option in the upper left corner.
    • If you are new, it will ask you to complete your profile. Complete the profile settings and hit safe.
    • It will take you to the bot creation page. Here, select a good picture and a catchy name for your AI bot. 
    • Next, select the base bot and enter the prompt. 
    • The interesting part is that it gives you the option to add your own knowledge base. This helps you completely customize the bot according to your preferences.
    • Next, add a greeting message and an engaging description for your bot.
    • There are some other settings that you can turn on and turn off according to your preference.
    • Once done, click on “create bot,” and your bot will be created.

    You can now chat with your AI bot, analyze its working, and polish it by editing the bot settings. It gives you the option to share your chatbot with others by sending them the link.

    How to Get Paid from Poe AI?

    The most-awaited part comes here. Poa AI gives you the option to earn money by monetizing your chatbot. You will earn money when either of the following conditions is fulfilled:. 

    • When your bot brings a user to Poe for the first time, they subscribe.
    • When your bot brings a user back to Poe and they subscribe.
    • When your bot’s paywall is seen just before a user subscribes,.
    • When users send messages to your bot.

    You can set a price per message. You will earn money every time a user messages your bot.

    Also, you can set a daily message limit, after which the users will see a paywall. If a user subscribes within 24 hours after seeing your paywall, you will be rewarded. You can earn $100 per subscriber.

    To enable monetization, 

    • Go to the “Creators” tool from the dashboard and click on ‘Enroll Now.”
    • Select your country. If your country is eligible for the program, you will see an interface like this.
    To enable monetization
    • Next, go back to monetization tools in your bot settings and turn on the “Daily message limit” option.
    • Here, you can customize your bot’s daily message limit and also set your bot’s price. 
    • The users will see the paywall after reaching the message limit.

    Conclusion.

    In conclusion, Poe AI is the one-stop AI solution for all AI enthusiasts. It offers a vast library of official and user-created chatbots.

    It saves your chat history, allows you to compare the responses of different chatbots, create your own bots and earn money. Various chatbots are available here, including OpenAI’s ChatGpt, Google’s Gemini, Claude, Llama from Meta, and others.

    It’s available both on the website and in the app version. It’s a freemium tool, and you can create your own bot that matches your preferences. Lastly, you can also  earn money by monetizing your chatbots.

    FAQs

    Does It provide API for businesses?

    Yes, it provides an API that you can integrate into your applications and add a touch of AI to our products.

    Can everyone earn money through Poe AI?

    Ans. Right now, only selected countries can earn money through their monetization programs.

    These countries include Argentina, Australia, Belgium, Canada, Colombia, Germany, Hong Kong, India, Ireland, Italy, Japan, Mexico, Portugal, Singapore, Spain, Switzerland, the United Kingdom, and the United States of America.

    If you belong to these countries, you can earn money every time Poe earns a subscriber through your chatbot.

    However, the price-per-message monetization option is only available in the United States of America.

    Can everyone see my conversations with Chatbot on Po AI?

    Ans. No, other users cannot see your conversations with chatbots unless you share the chat with them.

    More that you’d like to read…

    For more info visit Whatsmind.com

  • Apple removes WhatsApp and Threads from the Chinese App Store After Being Pressurized 

    Apple removes WhatsApp and Threads from the Chinese App Store After Being Pressurized 

    Apple removes WhatsApp and Threads from the Chinese App Store, which is a hot topic among social media users as the United States government passes a bill to ban it in the U.S. marketplace. 

    The Chinese government ordered Apple to remove WhatsApp and Threads from the Chinese App Store due to national security concerns. Apple confirmed the removal of both apps owned by Meta, owner of Facebook Mark Zuckerberg. 

    The decision was relayed to Apple under the instructions of the Chinese Cyberspace Administration and they had to remove the apps after immense pressure from the authorities. As you might have already noticed, the Chinese censorship and regulation of internet or online content is quite strict. Anything that deviates from their norms or poses a threat to them is removed promptly. 

    Chinese Cyberspace: Apple removes WhatsApp and Threads from Chinese App Store

    Apple wasn’t expecting the Chinese government to request the removal of WhatsApp and Threads from their App Store. However, they had to agree with their request as they operate in China and are obliged to follow their laws. China ordered multiple apps removal before this request, and the Chinese don’t have access to multiple popular apps in the world due to national security reasons. 

    China’s Great Firewall blocks multiple foreign apps, including the one Apple has to remove. Apple removes WhatsApp and Threads from the Chinese App Store, whereas, their firewall system has blocked multiple other sites as well, including:

    • Facebook
    • Twitter
    • Instagram
    • Pinterest
    • Snapchat
    • Linkedin (restricted local version)
    • Quora
    • Tumblr
    • Picasa
    • Clubhouse
    • WordPress.com
    • Blogspot
    • Blogger
    • Medium
    • Flickr
    • SoundCloud
    • Google Hangouts
    • Hootsuite
    • Badoo
    • Disqus
    • Tinder
    • GitHub

    These are the only social media applications that are banned in China to control the information flow, news channels and multiple other informative sites are also banned in the country. However, you can access these apps including WhatsApp and Threads if you have access to a VPN or iCloud accounts set on your iPhone. 

    Why Does Apple Remove WhatsApp and Threads from the Chinese App Store

    China’s communist ruling party forces tightening the censorship and control over the internet as children are using social media apps for longer intervals than necessary. Moreover, there is a continuous influx of sensitive content on social media, that the regulators are unable to spot. 

    Therefore, the Chinese government has proposed policies specially designed to monitor communication and reduce the time children spend online. Whereas, the concerns related to WhatsApp and Threads haven’t been revealed yet. 

    Is TikTok Banning Associated with the Removal of WhatsApp and Threads

    This removal isn’t a reaction to banning TikTok in the U.S. and passing a bill for its banning. Before the U.S. legislature voted on banning TikTok, the Chinese government had already sent their suggestions to Apple. Meanwhile, the U.S. government might be trying to pressure the Chinese company ByteDance to sell TikTok to the States. However, no such agreement has been confirmed yet, even when TikTok is facing a ban from the U.S. market. 

    Biden passed the bill to ban TikTok or shift it from Chinese ownership to U.S., due to national security concerns. According to lawmakers, TikTok is influencing the American public with foreign (Chinese) content. Therefore, they need to retain U.S. user data from China. 

    Why Does China Ban Applications and Websites?

    To preserve social order and public opinion, the Chinese government restricts the spread of information that can yield to security concerns. If there’s any question on legitimacy, deviation from official political position, or promotion of dissent, the Chinese government either vendor the content or blocks the software. 

    Banned News Websites in China

    Henceforth, China has banned the following news websites in their country:

    • New York Times
    • The Financial Times
    • The Economist
    • The Wall Street Journal
    • Bloomberg
    • Google News
    • Wikipedia

    Banned Media Sites in China

    Apart from that, you can’t use the following search engines in China:

    • The New York Times
    • The Financial Times
    • The Wall Street Journal
    • The Economist
    • Bloomberg
    • Reuters
    • The Washington Post
    • The South China Morning Post
    • The Independent
    • The Daily Mail
    • LeMonde
    • L’Equipe
    • Google News
    • Many Wikipedia pages
    • Wikileaks

    Banned Search Engines in China

    The banned search engines by the Chinese government see the following:

    • Google 
    • Ask.com
    • Duck Duck Go
    • Yahoo
    • Foreign versions of the Baidu messaging application 

    Banned Messaging Apps in China

    The banned messaging apps are the following:

    • Whatsapp
    • Messenger
    • Viber
    • Telegram
    • Line
    • Periscope
    • KaKao Talk
    • Discord
    • Clubhouse

    Conclusion

    Apple removed WhatsApp and Threads from the Chinese App Store amid security concerns and a similar thing is happening in the U.S. as well. It’s a well-known fact that applications collect data, but to what extent is still a mystery. Can the data from the apps pose a threat to the national security of a country is a huge issue. 

    Apple removes WhatsApp and Threads from the Chinese App Store, what do you think about it and banning TikTok from the US marketplace, comment below. 

    For more info visit Whatsmind.com

  • Top Strategies for Google’s Helpful Content Update in 2024

    Top Strategies for Google’s Helpful Content Update in 2024

    Google updates came in March 2024, and many will come in the upcoming month. However, many websites lag after the updates due to their lack of quality content and AI-generated content. Hence, one should know how to recover Google’s helpful content updates. 

    Google’s Helpful Content Update (HCU) is an automated system that prioritizes high-quality, valuable, and original content in search results. The machine learning model operates on a site-wide signal that’s assessed on Google’s ranking strategies. 

    How Does Google’s Helpful Content Update Work?

    If you generate helpful content, you might not need any strategies. Whereas, if there is a traffic change due to the system, you will need to assess and follow strategies to improve the content. Google’s system classifier runs repeatedly and its purpose is to determine unhelpful content. The algorithms periodically improve the classifier removing unhelpful content in the long term. 

    After that, the search engine generates a Google’s helpful content update and the previous updates no longer remain relevant due to new modifications and updates. 

    Key Points of Google’s Content Update

    • The Google updates are no longer site-wide signals in 2024
    • If your site gets affected, it will only affect a few pages on your site, but not the whole website
    • Your entire website might not be categorized as unhelpful. 
    • Your overall search performance can be affected due to high amounts of unhelpful content 
    • If there’s a single keyword that specifies your content as relevant to a query, then your content will rank to that keyword 
    • You will be responsible for third-party content on the committee  
    • Analyze your forums, reviews, and advertisements hosted on your subdomains 
    • The HCU also impacts the Google Discover appearances 
    March Update 2024 of Google is Rolled-Out! Websites Lost Millions of Traffic

    Top Strategies Google’s Helpful Content Update

    Several strategies help improve the recovery of the website which are pinpointed after analyzing various specific web pages through web history archives. Moreover, the comparisons among the improved versions and the domain’s performance before the update are analyzed. Later, the results brought about enhancements that you can implement on your site:

    Specifying the Title 

    The title must be specific, containing numbers, and specific keywords such as “21”, “Mexico”, “2024”, “USA” and “9 tips.” Such specific keywords add specificity, timeliness, stimulating click-through rates, and SEO optimization. 

    • Use numbers for specificity
    • Include relevant locations, regions, or places 
    • Add the current or upcoming year
    • Add facts and numbers 

    Personalize Your Introduction

    Personalize Your Introduction

    A personalized, systematic, and to the point is necessary to add to the content. The specific, complete, and concise introduction showcases the experience and quality of the information which fosters trust and engagement (fundamentals of SEO). 

    • Share the background of the topic 
    • Highlight your expertise
    • Connect with your audience
    • Share infographics and statistics 

    Optimizing Header Image

    You should remove the large dark header image as it enhances user experience and SEO. Additionally, it begins the content above the fold to attract an audience. 

    • Use relevant and high-quality images
    • Avoid long and distracting headers
    • Prioritize content visibility
    • Utilize optimized headers 

    Minimizing Social Media Icons

    Minimizing Social Media Icons

    Google removed numerous social media sharing icons to concentrate on reducing distractions, adding quality, and strengthening SEO. 

    • You need to limit the number of icons
    • Place icons strategically and systemically 
    • Ensure content quality is the main focus

    Exhibit the Author

    If you add a personal author with authentic images, it creates a huge impact. The relevant image will add credibility and boost user experience. 

    • Use a professional author photo relevant to the content 
    • Share a brief author bio
    • Connect the author to the content
    • Share the author’s social media handles 

    Include a Table of Contents

    You must include a tale of contents, so the reader can get the overview of the content and doesn’t get distracted. Moreover, add jump to links, so they find the content easily accessible, improve navigation, and boost user experience.  

    • List all main sections, main headings, and subheadings 
    • Use jump-to-links for easy navigation
    • Update the table as the content evolves or gets edited 
    What to Expect from Spam and Core Google’s March Update 2024

    Expand Your Content

    Depth is one of the most important factors for adding relevant SEO ranking to your content. Hence, add personal experience and other necessary information. 

    • Cover related subtopics
    • Provide comprehensive and inclusive information
    • Regularly update and extend content

    Highlight Top Picks

    The top picks, usually the first 3 highlight the most relevant and user-friendly content. Hence, the information that you require will be most probably in the first three links to various websites on the browser. Apart from that, the best results are available on the first page of the browser. 

    • Feature top recommendations and tips 
    • Provide concise, complete, concrete, and valuable information
    • Update picks based on changes or new information and trends 

    Conclusion 

    Google’s helpful content update is crucial to website owners as it can affect the reach and rank of the domains and block their access if it deems them unhelpful and untrustworthy. Google frequently updates its system, hence, one should keep their eyes on it to keep their content optimized and relevant to the new helpful updates. 

    For more info visit Whatsmind.com

  • Discover The Ultimate Solution For Secure Browsing: Free VPN Download

    Discover The Ultimate Solution For Secure Browsing: Free VPN Download

    In this digital age, protecting your online privacy and visibility has become very important. Cyber threats are happening anywhere, so keep and maintain your browsing data privacy while you search for things on the internet.

    To tackle this situation, a very handy option “VPN (Virtual Private Network)” is available. It works as a protective wall against the nosy people. The free VPN download here is the most effective issue you want if you need a reliable VPN service that might not break the bank.

    Unlocking Unparalleled Security

    Do you think Free VPN Planet is the best alternative for people who are concerned about their privacy? It works by encrypting your internet connection and also sends it through safe servers. The Free VPN download Planet hides the IP address for security purposes from hackers and nosy people.

    Also from authorities who try to watch what you are viewing or searching. It is sure that your data is safe from people who are not able to see it. However, you are using public Wi-Fi networks, streaming content, and doing important transactions.

    Seamless Accessibility

    Seamless Accessibility

    The two properties of Free VPN Planet are a user-friendly interface and easy entry make it outstanding. There is no difficulty to browse on the internet without any limits along working on different gadgets and operating systems.

    These systems may be Windows, macOS, Android, and iOS. You can check it from the workplace, at home, or even when you are outside and have no time. You should have no fear about their slow speed and any negative overall performance.

    Unrestricted Access to Geo-Restricted Content

    You can decide your boundaries when you get around censorship with the help of Free VPN Planet’s community servers. This VPN allows their users to watch their favorite TV dramas, and movies and browse websites without any restrictions. 

    Also allows you to get content from all over the world via geo-blocks. The Free VPN Planet gives you the right you use any website that is not available in your country as well as watch Netflix.

    Protecting Your Privacy Every Step of the Way

    Protecting your privacy is not just a promise by Free VPN Planet, but they assure it. Many other VPN services keep track of when you become online or not. However, the Free VPN Planet has a sufficiently good policy that they do not have any track record about when you come online and what you do.

    This method ensures that your browsing history remains personal and safe. Because the placement of servers is done very carefully in areas that recognize privacy, you can make sure that your statistics are safe and no one will reach this without your permission.

    Take the First Step Towards Secure Browsing

    Are you ready to pay a fee for your online safety and privacy? With the quick downloading of Free VPN Planet, you get your desired choice. By just clicking on the download here button, you start to secure and unrestricted your browsing. You may protect your digital footprints with this VPN and join the team of hundreds of happy customers.

    Conclusion

    There are a lot of online dangers these days, so maintaining your privacy and protection may be very critical. when you are using the Free VPN Planet, you browse the web without distrubing safety breaches or even nosy people who are always in search of other’s information. Move to Free VPN Planet these days and enjoy secure and unrestricted viewing. Don’t change and compromise your online privacy.

    More that you’d like to read…

    For more info visit Whatsmind.com

  • How will a Solar Panel for the Human Eye Impact on the Lives of People

    How will a Solar Panel for the Human Eye Impact on the Lives of People

    The University of New South Wales (UNSW) ranks 2nd in Australia as the best university. UNSW engineers are examining eyes as they’re gearing up to add a solar panel for the human eye. The panels will be implanted into human retinas to restore eyesight.

    The engineers are working on neuroprosthetics technology to vastly improve the quality of life. The devices interact with the nervous system to restore the lost functionality of organs. People who can’t see clearly can finally glimpse at the colors of life and embrace the light without any glasses or lenses through the invention. 

    Likewise, engineers have an implant of cochlear which converts sound into electric signals. The signals directly stimulate the auditory nerve in humans, henceforth, people with hearing loss or severely damaged hearing can hear normally. 

    How does a Solar Panel for the Human Eye Work?

    How does a Solar Panel for the Human Eye Work?

    Are you wondering if the project of implanting a solar panel for the human eye is possible? Thectexhnologu is making advancements day by day and the fictional or utopian dreams of people are no longer a fantasy. A solar panel for the human eye is one of those inventions that will greatly influence the lives of people. 

    People who have damaged photoreceptors (cells in the eyes that are responsible for detecting light and color) can’t see clearly. However, a team of professional researchers around the world including clinicians, engineers, neuroscientists, and other biotech faculties believes that the idea has the scope and the possibility of its success is high. 

    One of the UNSW researchers, Dr. Udi Roemer, is researching solar technology. The photovoltaic engineer dealing with solar panel technology is in his early research phase. According to his research, he has to bring about a solution on how to convert the light entering the eye into electricity. If it converts into electrical signals, the damaged part won’t be able to hinder the photoreceptors from transmitting visual information to the brain. 

    According to Dr. Roemer, people with certain diseases and age-related vascular degeneration lose their eyesight gradually. Likewise, patients with retinitis pigmentosa faced degeneration of the photoreceptor at the center of their eyes. To cure the retina related eye diseases, they are trying to research various solutions:

    • Biomedical implants in the retains 
    • The usage of electrodes to create voltage pulses in the eye to make people see the image 

    Although, the engineers are clinically testing the methods. Meanwhile, the clinicians find it tough to add wires along with modern technology into the eye. Henceforth, they need to observe a wireless option. 

    What are the Wireless Options of a Solar Panel for the Human Eye? 

    Unlike adding electrodes into the eye, the researchers are trying to utilize its alternative method — adding a tiny solar panel in the eye. The solar panel will be linked with the eyeball and its function will be to convert life into electrical impulses. Then, the sensory neurons will transmit them to the brain. Hence, it will eventually form our visual fields and we’ll be able to see the spot. 

    Solar panels will be naturally self-operational and portable, hence, you won’t need to install cables and wires in the eye. 

    Do you think Dr. Roemer isn’t the first to investigate solar panels and their installation into the eye? He is investigating functionalities of solar cells, silicon-based devices, and semiconductor materials to restore sight. The major semiconductors he’s focusing on are gallium, indium phosphide, and gallium arsenide. Gallium semiconductors are easy to tune due to their material properties. 

    Moreover, solar industries also employ them. They have multiple perks for the industrialists, such as inexpensive costs, and efficiency. As compared to all-purpose silicone, gallium is expensive. 

    How Can I See with Solar Cells?

    How Can I See with Solar Cells?

    Installing a solar panel for the human eye requires high voltage. One solar cell can’t provide the required quantity of voltage to send the signals to brain cells. Almost three cells might be able to send the signals to the brain. The process is difficult to achieve with silicon, therefore, the engineers are using gallium instead. 

    Until now, Dr. Former has successfully put two solar cells together in the lab of about 1 cm². In the next step, they have to make them into two ting pixels needed for sight. Apart from that, they have to etch the grooves to separate them to achieve the stack of three solar cells. The small step of changing it into pixels is significant for the progress of the experiment. 

    After its successful prototype formulation which will be soon, they will test the product in humans. Until now, they have conducted extensive research on animals in the lab and the results are satisfactory. 

    How will the Eye Solar Cells Device Look?

    According to Dr. Roemer, the technology will be about 2 mm² in size, along with pixels measuring about 50 micrometers ( a micrometer is one-hundredth of a millimeter). 

    In addition, he shared that solar cells might not be activated with normal sunlight. As a consequence, the user might have to wear additional goggles or a device to amplify the sunlight to a certain extent to activate the electric signals in the solar cells. 

    What do you think about the new research and innovation of a solar panel for the human eye and how it will impact the lives of people with eyesight issues, comment below. 

    For more info visit Whatsmind.com

  • How to Cancel Shopify Subscription, Delete and Pause your Account?

    How to Cancel Shopify Subscription, Delete and Pause your Account?

    Shopify is a popular e-commerce platform, but it has numerous drawbacks which make it uneasy to use. Therefore, many Shopify users are eager to know “how to cancel Shopify subscription.” If you don’t find it appealing to use the platform and want to join another digital platform, you can cancel your subscription. 

    Deleting a Shopify account and canceling its subscription is relatively easier. All you need to do is follow the simple steps of how to cancel Shopify subscription, deactivate your account, delete your store guide, and achieve your purpose. Apart from that, you can also back up your Shopify account and migrate it somewhere else as well. 

    How to Cancel Shopify Subscription and Delete the Account?

    How to Cancel Shopify Subscription and Delete the Account?

    To cancel the Shopify subscription, follow the steps:

    • Open Shopify 
    • Login to your admin panel 
    • Navigate to settings 
    • Select Plan, after that, Choose the option Pause or Cancel subscription
    • Confirm cancel subscription 
    •  Review whether you want to sell your account or pause the subscription and use it later
    • If you don’t want to pause, rather cancel the subscription, click on cancel and close the store 
    • A new tab will appear, choose the reason for deleting a subscription 
    • Continue and add your password to confirm the action 
    • Close the store permanently 

    Remember that the platform allows 30 days to undo your calculations hence, if you change your mind and want to open the store, you can do it in the next 30 days after its cancellation. You will need to resume your account through the admin panel and link your credit card, as well as begin the billing process.  

    What are Shopify’s Drawbacks?

    There are a handful of reasons why you would prefer canceling your Shopify subscription, some of the significant drawbacks of using Shopify are as follows:

    • Lacks customization options 

    Store owners who want to design their shops and add multiple features to the platform find it frustrating to use the site due to the lack of customization options. Therefore, they have to compromise over the appearance and user-friendly interface of their shop. The designs and templates available aren’t up to date, hence, limiting the functionality. As a consequence, owners can’t create a custom look or have control over their brands. 

    • High Transaction Fees

    Shopify charges a small percentage of every transaction to the merchants. Additionally, they have to pay processing fees as well. For instance, if an owner sells a product at $100, only $97 will be added to his balance. Shipping fees, taxes, and additional fees will also be deducted from the remaining $97. 

    Apart from that, the platform lacks diverse digital transaction options. Unlike other digital sites, you will have limited access to transaction options, with popular payment methods unavailable (PayPal and credit card). Such limitations not only affect business owners but also users who want to purchase the services and are unable to process transactions due to a lack of options. 

    As a result, the consumer base becomes stringent. 

    • Difficult to Migrate Data

    Shopify is a hosted application, therefore, one needs to follow complex steps to migrate their data from one site to another. The platform doesn’t allow you to directly transfer data, as it stores the data in Shopify servers. As a consequence, you need to first export all the data to the cloud or drive and then import it to the new platform. 

    What Factors You Should Consider Before Canceling your Shopify Subscription?

    Before thinking about how to cancel Shopify subscription, one needs to understand various factors that will be detrimental to your store:

    Settle Charges and Outstanding Bills 

    If you have any pending bills or payments, you will need to pay them. If you don’t clear the outstanding bills, you won’t be able to cancel your subscription or delete your account. Even if you can close the shop, you will receive a bill. 

    Saving your Data

    Before deleting the account, you must save your data as it will be lost otherwise. Even if you close the store, you will need the data later and you can retrieve it from your drive or cloud accounts. Copy all the data and store it in your trustworthy accounts. 

    You can export CSV files and other data to back up including:

    • Billing history
    • Customer data
    • Discount and gift card codes
    • Financial data
    • Order data
    • Product data

    Cancel Third-Party Application Subscriptions

    After canceling your Shopify account, you will need to cancel third-party application plans manually. Deleting your account won’t atomically cancel the third-party providers’ plans. If you don’t do so, it might add unexpected charges to your credit card. Therefore, it’s better to be safe than sorry and delete the additional subscriptions. 

    To do this, follow the steps:

    • Log in to your Shopify
    • Navigate the admin panel and go to Apps
    • Select each app you intend to uninstall
    • In the dialog, click Delete

    Frequently Asked Questions (FAQs)

    What Happens When the Shopify Trial Expires?

    Just like other applications that offer premium plans and subscriptions, the software will ultimately lock itself after the trial period ends. If you want to enjoy the services further, you will need to subscribe to their plan and login into your account. 

    How to Pause a Shopify Store?

    To pause your Shopify account, you will need to follow similar steps as how to cancel Spotify subscription:

    • Log in to the Shopify admin dashboard
    • Select on Settings
    • Press on the plan tab 
    • Choose between Pause or canceling a subscription 
    • Press on the option pause and build or Pause for 90 days
    • Confirm Pause store

    What is a Shopify Domain Cost?

    Shopify domain cost can change over time, however, it’s $11 per year presently. Therefore, it’s recommended to confirm it before buying the domain. The price ranges also depend on the top-level domain (TLD) extension and the other versions.

    How to Unpause the Shopify Store?

    To unpause or reopen the Shopify store, follow the following steps:

    • Login to your Shopify admin panel
    • Select Settings 
    • Click on Plan
    • Pick a plan from the dialogue box
    • Choose Plan and lastly click on Start plan 

    That’s all about how to cancel Shopify subscription, delete your account and pause the store. 

    More that you would like to read…

    For more info visit Whatsmind.com

  • What to Expect from Spam and Core Google’s March Update 2024

    What to Expect from Spam and Core Google’s March Update 2024

    Google’s March Update 2024 is making SEO experts tremble. With every update, the websites face a real deal of trouble with their rankings dropping. As a consequence, the profit and the views stumble as well. Therefore, several bloggers are always walking on eggshells just because of the constant Google updates. 

    The Google spam update almost took 15 days (particularly 14 days and 21 hours) to finalize, whereas, Google’s March Update 2024 (the core) is yet to roll out. The spam update was initiated on March 5, 2024, and ended on March 20, 2024. 

    On March 5, Google representative Chris Nelson startled the people with the news of the spam update launch date and its new policies.  

    Spam Google Update and Spam Prevention New Policies 

    Spam Google Update and Spam Prevention New Policies 

    Google’s automated system continuously detects search spam operating on the browser and makes specific modifications to how they work. SpamBrain is an AI-based tool that helps the search engine in spam prevention. Through modifying its system to become much more efficient in spitting new types of spam, it needs to constantly upgrade the model. 

    On the list of Google search ranking updates, the team shares the spam update details. After the updates, websites that undergo some changes should observe the new Google spam policies. If a site doesn’t comply with the modifications, it will rank lower in the results. Sometimes, such sites might not appear on the results as well. 

    If a site makes changes after learning the new policies and the automated system observes them timely, the site might receive a higher ranking. The same isn’t possible for spam link updates as the links lost their function after the modification. Hence, one shouldn’t assume that they will benefit from the links or site modifications might bring the functionality of the links back. 

    What are the New Spam Policies?

    The new spam policies introduced by Google in March 2024 are the following:

    • Scaled content abuse
    • Expired domain abuse 
    • Site reputation abuse

    Scale content abuse and expired domain abuse have begun working proficiently, whereas site reputation abuse will probably go into effect in May. 

    What will Google’s March Update 2024 Include?

    If you are following Google updates regularly, you must know what the search engine is targeting frequently nowadays. 

    Even if you don’t, the article will explain what Google March Update 2024 will target. The websites that are being e-indexed undergo various traffic losses and recency constraints. 

    Extensive Deindexing 

    Extensive Deindexing 

    Nutamm’s analysis portrays the statistics of the 837 deindexed sites. The websites had 20.7 million monthly organic search visits before the manual actions, however, the traffic suddenly dwindled after the manual action. The deindexed sites might withstand a loss of over $446,552. 

    Targeting AI-Generated Spam

    Originality.ai conducted a study while investigating the prevalence of AI-generated content on the deindexed sites, the results were similar to Nuttall’s analysis — 100% of the deindexed websites had signs of AI-generated content. 

    Among the affected sites, the don’t t was particularly written by AI as 50% of them had 90 – 100% AI-written content. Hence, the sires that post AI-written content should hear up for being annexed by Google and raking traffic losses. They won’t be able to manipulate the rankings anymore with their low-quality content. 

    Reshaping Search Terrain 

    As Google’s March Update 2024 a rolling out, it will significantly alter the search landscapes of the search engine. The search quality will boost after deindexing low-quality, AI-written content and websites with inadequate content. Hence, the research results will carry appropriate, to-the-point, and quality content. 

    Penalties and Error filled Websites 

    Multiple websites received penalties, the main reason was their low E-E-A-T score. It indicates that the sites have outdated, AI-written, error-filled, and vulnerable content. Henceforth, Google considers them untrustworthy and takes sharp action against them. Particularly, AI-written content is usually outdated, has low quality, errors, and has no human touch, therefore it gets easily automated by the system and gets deindexed.

    What to expect from Google’s March Update 2024 is not a tough task, read the article and avoid the pointers that Google will consider for deindexing multiple websites all over the world. Even the small websites and the ones that have ranked higher during the last update will be prone to its new policies. 

    Make sure to follow the guidelines and keep your revenue, traffic, and profits steady. 

    More that you may like to read…

    For more info visit Whatsmind.com

  • Updated Guide: How to Add Money to Venmo in 2024

    Updated Guide: How to Add Money to Venmo in 2024

    Let’s go out to eat and split the bill in American style, do you always go through this hassle as well? Not anymore, as Venmo has eliminated the stress of splitting bills equally among friends. If you are wondering how is this possible, read about How to add money to Venmo to make your shopping easier. 

    The app has made it easier to transfer money from different applications to send money to the Philippines. Venmo, owned by PayPal, has surpassed over 100 million accounts. According to a study, 19% of shoppers are more likely to purchase through Venmo if they use digital wallet services. Moreover, Venmo users shop twice as much as traditional shoppers.  

    In this article, we will discuss how to add money to Venmo, how to sign up for identification, how to get a Venmo debit card, and the documents required for the process. 

    How to add money to Venmo accounts directly from the bank?

    How to add money to Venmo accounts directly from the bank?

    Many people don’t know how to add money to Venmo accounts, however, you need a Venmo debit card for this purpose. In the future, the developers might expand the feature to allow non-card users to add balance to their payments. If you are looking forward to having access to the feature, you must get their debit card first.

    How to Sign up for a Venmo Debit Card?

    Getting a Venmo debit card is crucial to adding money to your account and increasing the balance. 

    Remember you Venmo credit cards have similar functions as any other debit card and utilizing it won’t affect your credit scores. The best feature is that the user does not need to maintain a minimum m balance or recharge monthly fees to access the debit card. 

    The sign-up process is simple, all you need to do is: verify your identity for better security (only users with identity verification can have access to their debit card as it prevents scams). Fulfill the following steps to sign up correctly along with identity verification:

    • Open the Venmo app after installing it 
    • Tap on the Me tab of the Venmo app
    • Tap on the gear symbol at the upper right corner of the screen 
    • Settings will open, select the “Identity Verification” option 
    • Follow the given on-screen steps to complete the process 

    After confirming the identity and verifying the details, you need to follow the steps:

    • Open the app
    • Tap on the Cards tab 
    • Click on “Sign up for Venmo Debit Card” to proceed further 
    • And lastly, clink in “Get Venmo Card” 
    • Then, you just need to follow the on-screen instructions and set up your Venmo account

    How to add money to Venmo Accounts?

    Are you ready to add money to your Venmo account? Follow the given steps after identifying verification to add money: 

    •  Open the Venmo app
    • Tap on the Me tab
    • Locate the wallet section and click on “Manage balance”
    • Select the Add Money icon 
    • Choose the link account to add money 
    • Type the required amount and tap on the Add button

    How much time does Money Transfer Take on Venmo?

    How much time does Money Transfer Take on Venmo?

    Many people think it takes 30 minutes or some time to transfer money. However, it’s not true if you have selected a debit card as your funding source. After making the payment, the balance shows up in the account instantly. But, a similar thing doesn’t apply to business account transferring. 

    When you select your bank account as your account to transfer payment, it takes 3 to 5 business days to transfer the money. Therefore, be it card option is much more feasible. Additionally, you can also link your smartphone Wallet Such as Apple Walker to the Venmo app and make countless payments through it in multiple stores. 

    What Type of Documentation Does Venmo Collect During the Account Verification?

    While verifying the identity for making an account, you need to verify various things such as:

    • Name
    • Address
    • Date of birth 
    • Social security number
    • Individual Taxpayer identification number 

    Apart from that, you may need to submit additional documents for the activation of name and date of birth: 

    • U.S. passport
    • Driver license
    • Government-issued ID
    • DHS card
    • Tribal ID card

    For verification of address, you might need to submit the following documents:

    • Bank, credit card, or brokerage statement
    • Utility bill
    • W2 or paystub
    • Lease
    • Car registration
    • IRS letter
    • Driver license 
    • Other government documents containing your address 

    For the verification of SSN and ITIN, you need:

    • SSN card or assignment letter
    • W2 or paystub
    • IRS letter

    Are Venmo Transactions Safe?

    Venmo has an end to encryption, hence, it protects your account’s financial information. While making payments, you can verify the account holder’s username and profile picture with ease. Therefore, payments are accurately sent to their rightful owners. 

    If you’re transferring to a new account, the app will ask to verify the account holder’s number. Usually, you just need to put the last four digits to verify your identity. Apart from that, you can modify two-step certification and other features to have your financial amount from the other accounts. 

    Share your reviews in the comments about the guide on how to add money to Venmo. 

    More that you may like to read…

    For more info visit Whatsmind.com